Benvinguts! Wellcome!

Ja fa tres anys que a l'Escola Rocaprevera vam iniciar el Projecte Arts. Els alumnes de 3r, 4t, 5è i 6è de primària reben les classes d'Educació Visual i Plàstica en llengua anglesa. Engrescats pels bons resultats obtinguts, aquest curs l'hem començat a introduir a l'ESO.
Aquest bloc pretén ser un recull dels treballs més significatius realitzats pels alumnes, des de 1r de Primària fins a 4t d'ESO.
El nom del nostre bloc és un petit homenatge al gran pintor Vincent Van Gogh i a la seva extraordinària obra. Com podeu observar, el fons també està inspirat en les creacions de Gustav Klimt.

dimecres, 27 de març del 2013

EASTER EGGS. 3r primària


The students of 3r decorated some Easter eggs.

First of all, they boiled two eggs at home and took them to school. In Arts class we explained four different techniques and the students chose which ones they preferred.

-Using star-shaped pasta: they painted the pasta in different colours and let them dry. Then they poured them in different plastic bowls. The second step was to coat the egg with glue and stick the different pieces of pasta on it.  

-Crayon colours: this technique consisted in drawing on the shell with the crayons. The students could choose the design (dots, borders, squares, flags, flowers...)

- Wavy cardboard:
they painted a piece of a wavy cardboard with paint and they rolled the egg across. Then, they allowed the paint to dry, and repeated the same process if they wanted to add more colours. The second step was to paint some petals with toothpicks to create a field of spring flowers.

-Aluminium foil technique: the first step was to crumple a large square of aluminium and then coat the foil with paint. The second step was to set the egg in the center of the foil and wrap it. Once finished, they removed the egg to let it dry. They could repeat it with other colours if they wanted to have a more intensely coloured egg. 


https://plus.google.com/photos/104621044568984632273/albums/5859978367768697937?authkey=CNaJm7j_nqKhGg

dimecres, 13 de març del 2013

LINOGRAVAT. 4t ESO

El Linogravat  o gravat sobre linòleum (linocut en anglès) és una tècnica d'impressió que utilitza plaques de linòleum com a suport.

El linòleum és un material que fa uns anys s'utiltizava per aïllar el sòl dels pisos. Es tracta d'una pasta feta de resines, suro i oli de lli que es diposita sobre una tela d'arpillera i es deixa assecar en forma de planxa.
Aquestes planxes es treballen tallant-les i buidant-les mitjançant gúbies, de manera que la imatge que gravarem queda en relleu i el fons queda rebaixat.
Després de tallar s'entinta amb un corró, de manera que la tinta mulla només les parts que no hem rebaixat. En aplicar-ho per estampació sobre un paper, les parts entintades reproduiran el dibuix.


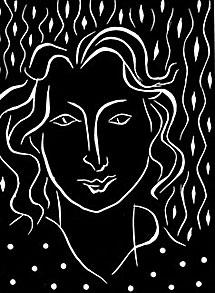
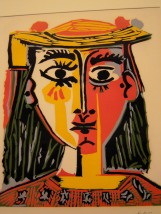
Aquesta no ha estat una tècnica molt emprada pels artistes, però podem destacar algunes obres de Picasso i de Matisse:
Picasso - Natura morta (1962)

Henri Matisse - Primavera

El linogravat és una tècnica de certa complexitat, sobretot per la dificultat de gravar les planxes de linòleum.  Podem escalfar una mica les planxes (per exemple, posant-les sobre un radiador) i no ens costaran tant de tallar.  Cal anar amb compte amb les gúbies, que són bastant esmolades.  Vigileu de no posar mai els dits al seu davant!  
També cal estar alerta a l'hora de fer el dibuix: hem de tenir molt clar que les parts rebaixades i tallades quedaran blanques, i la resta en color.  Per això, abans de començar, és recomanable fer un esbós del que volem que sigui el resultat.

Tot i la dificultat, podem aconseguir resultats excel·lents:

Pat Snyder - The Hub
Chris Pig - Lorenzo
A continuació us deixo un vídeo explicatiu sobre la tècnica del linogravat:


I per acabar, una aplicació d'Artisancam podem practicar el linogravat online, a la vegada que coneixem les obres d'Edward Bawden: Explore lino-printing with Edward Bawden.


dimarts, 26 de febrer del 2013

HAND CLAY. 6è Primària

The students of 6è made a clay hand.

Firstly, we cut a slab of clay for every pupil. Secondly, they pressed down the clay during two or three minutes and they shaped it into a ball shape. In case the clay was not soft enough, they wet the hands in order to work the clay properly.

Then, with a rolling pin, the clay was rolled and patted into a regular mass. With both hands, it was squeezed and pressed out slowly until they got a hand form.

The students only used their fingers and some clay tools to mark the fine lines and the visible veins as well as the finger nails and skin creases.

Once the hand was dried, they varnished it to make the hand brighter.


diumenge, 17 de febrer del 2013

STILL LIFE. 4t Primària


The students of 4t drew a still life painting. To do it, they took some real objects from home: jars, vases, flower pots, glasses...
Then, we arranged them in four different compositions and the students drew the one which contained the object they had taken. They used pencil to draw the figures and carbon pencil for the shadows.
Children experimented with light and shade: they looked at the object and studied their shape and the shadows the objects made in relation to other objects.

dilluns, 11 de febrer del 2013

WINTER LANDSCAPE. 4t Primària

The students of 4t of primària made a typical penguin ice winter landscape.

First of all, they painted a card with a white wax crayon. Afterwards, they crumpled it up as if it was a ball. They pressed the paper very hard for a few minutes and then they unfolded it again. The second step was to paint the entirely card with blue paint and, just immediately, clean the paint under the tap. The blue paint remained mainly on the paper creases.

The card appearance was like the Antarctica, full of ice shelves. The students used some blue wax crayons to distinguish the lines that separate the sea, the sky and the ice.

Finally, they made some origami penguins with bright color paper. They used different sizes to create a penguin family.   

BLOWING PAINTING. 6è Primària


The students of 6è made blow paintings by using watercolours and straws. A Straw-Blown painting is an interesting painting activity. Rather than using a brush to apply their paint, they used the air in their lungs.

Firstly, they painted some test tubes by mixing watercolours and then they blew them with  straws to get a scientific effect.

In this activity, the students used their imagination and their scientific abilities. They were able to create designs that would be hard to do with a typical paintbrush. So take a deep breath an go for it!